Mushroom Contamination Guide: Prevention, Identification and Treatment.

Unfortunately, it is very likely that we will all experience contamination in our projects at some point in time. Whether you’re a beginner or expert, contamination does not discriminate. Once it’s here, it’s here to stay. Unless you know how to prevent, identify and deal with it!

How to Prevent Contamination

The easiest way to prevent contamination is to follow the guides and information available from whoever you’ve bought your kits from (hopefully us!). You can find our guides here. As for our advice, you’re in the right place already!

Environment

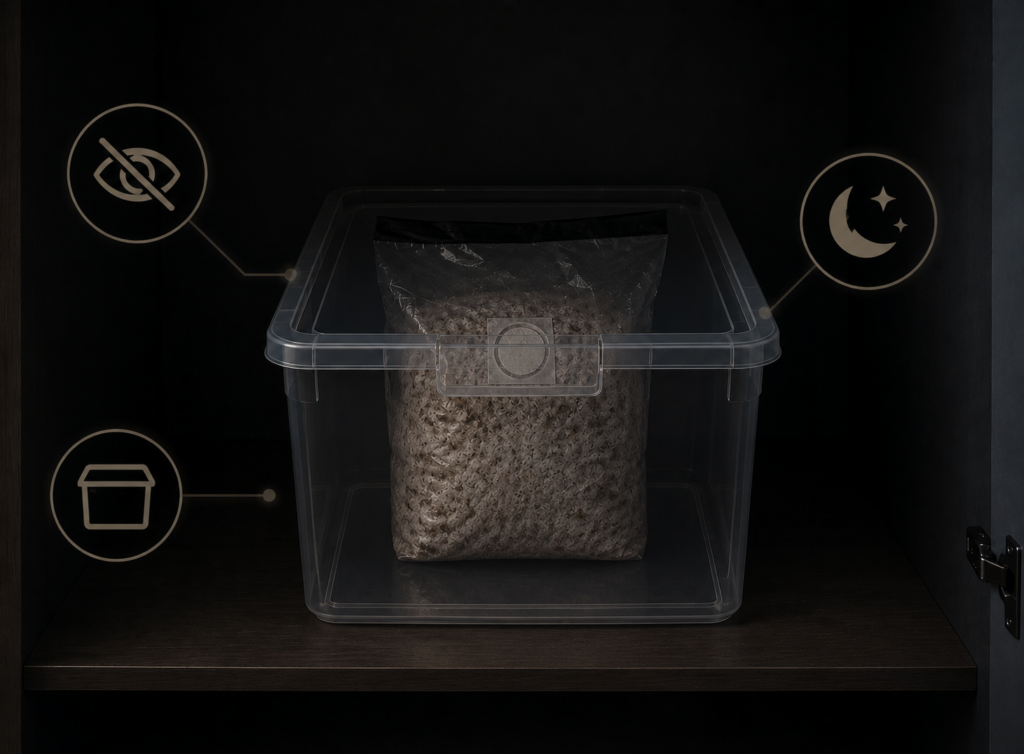
Preventing contamination starts before you’ve begun your project. Your project wants to be somewhere with consistent conditions (temperature, light, humidity, etc.), otherwise it can go dormant which makes it more susceptible to contamination. It also needs to be protected from contaminants, which can be freely found within the home.

The environment you’re planning to house your kit in must be consistently warm. A cupboard or grow tent inside of your house would be perfect as these areas are built to maintain the ambient temperature and protect you from the elements.

A garage, greenhouse or conservatory is not suitable as this will fluctuate, and your project may stall.

beginner mushroom grow kit in colonisation conditions
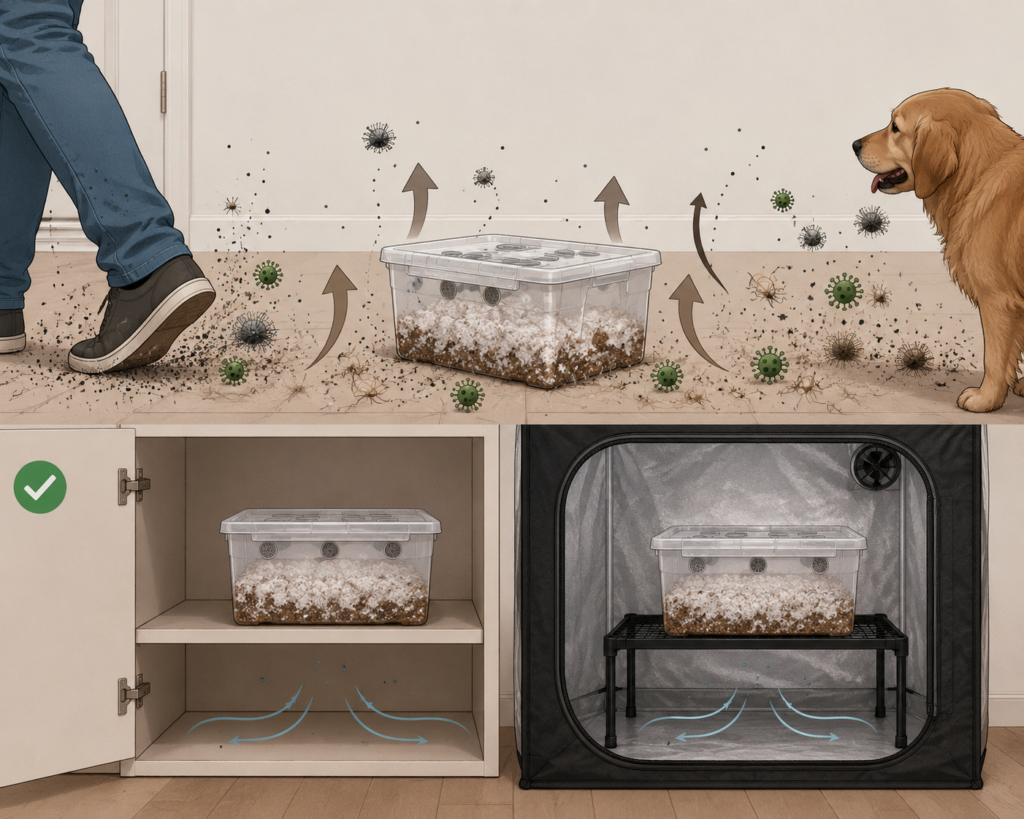
Using a plastic storage container with holes in can help with humidity, heat and prevent contaminants.
Keeping it raised and away from the floor will prevent your project coming into contact with contamination.

We would also recommend against kitchens, bathrooms and areas where people and pets frequent as this will put your project in an area with higher volumes of contamination.

 Floors are hotbeds for contamination as this is where dirt and dander settle and can be kicked up, coming into contact with your project and wreaking havoc. It’s best to keep them 1½-2ft off of the floor, in a cupboard, plastic chamber, or tent to prevent this.

Clean workspace

Once your environment is sorted, you want to ensure your workspace is clean, using 70% Isopropyl alcohol wipes or spray to disinfect surfaces. Once disinfected, give the area 30 minutes for the alcohol to dissipate (as mycelium hates alcohol too!), and then you can inoculate!

Inoculation should be easy and stress free if you follow our guides! Inoculate with clean, dry hands or using clean sterile gloves for best practice.

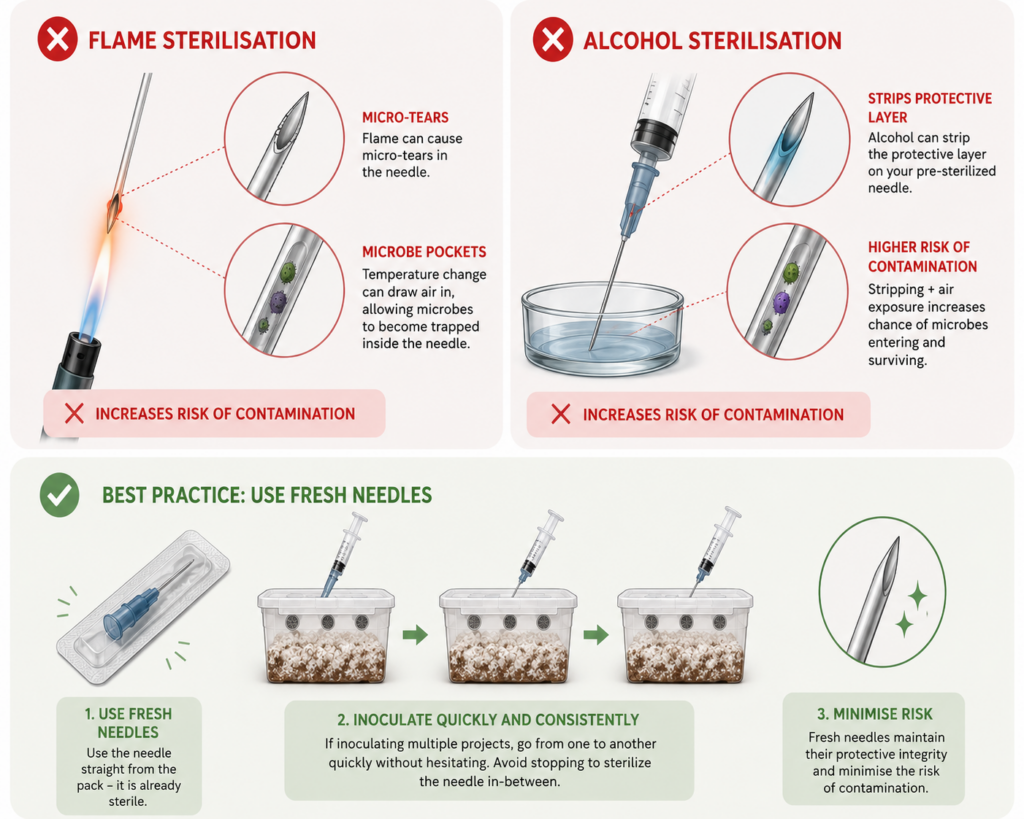
Ensure you do not sterilize the provided needle, as this can damage the superior sterilized protective layer and increase the chances of contamination. Using fresh, NHS grade needles every time prevents this risk!

You can sterilize the injection port with an alcohol wipe and leave it 15 seconds to dry prior to inoculation for extra peace of mind! If you’re using an all-in-one bag, make sure you do not touch the air filter as oils from our hands can damage the protective layer.

Diagram showing why flame and alcohol sterilization is inadequate.
Diagram showing why flame and alcohol sterilization is inferior to using fresh, NHS-grade needles.

Keep it Low-Contact

Every time you come into contact with your kit there is always a chance of contamination. We would advise against unnecessary constant checking on your kit as they need consistent conditions to colonize, and it may cause the kit to stall. 

Our all-in-one bags are protected up until you open them to fruit, but as long as you follow the above advice when interacting with your kit, you should be fine!

MonoTub kits can be more prone to contamination as they have a larger surface area and require a lot of hands-on support after colonisation. However, as long as you follow our advice, the chance of contaminating your project is much lower!

Spotted Contamination? Act FAST and IDENTIFY!

If using our kits, we would strongly recommend that you contact us as soon as you have spotted contamination with clear images. If you aren’t sure on the type of contamination, we can support you in identifying and minimising the impact it will have on your project.

If you’re a more confident and experienced mycologist, you may be able to do this yourself. However- we’d much prefer you contact us as some forms of contamination, although rare, can be dangerous.

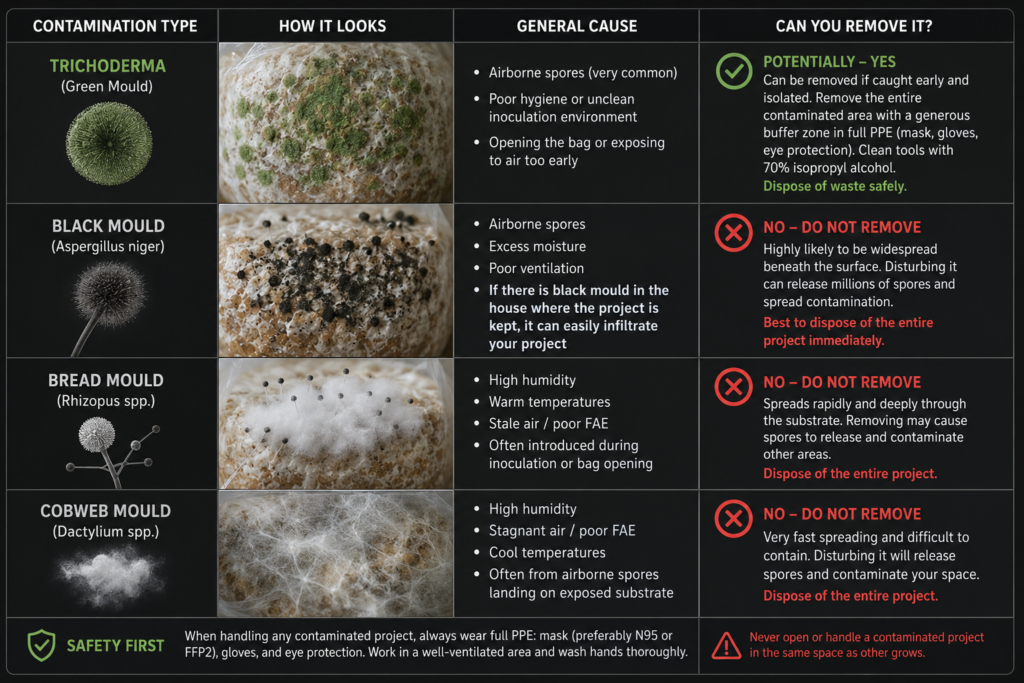
Bellow is a guide on how to identify common types of contamination you may run into, and if you can prevent it from spreading further.

Table showing different images of contamination, if you can safely remove it and how.
If your contamination does not look like any of the above, please do contact us as there are other rarer types out there which we can assist you with!

Treatment or Disposal?

If the species is an unsafe contaminant, we recommend disposing of the brick in your outside waste bin immediately. If you have a food waste bin, you can dispose of mycelium here.

If there is no colonisation within the bag, but contamination is present, please contact us immediately with images and remove the project away from any other projects you may have, but please do not dispose of it until you have spoken to us.

It is important to note that even if this is Trichoderma and can be removed from the project, if there is no mycelium present then it’s highly unlikely your Gourmet Health Mushroom project will recover.

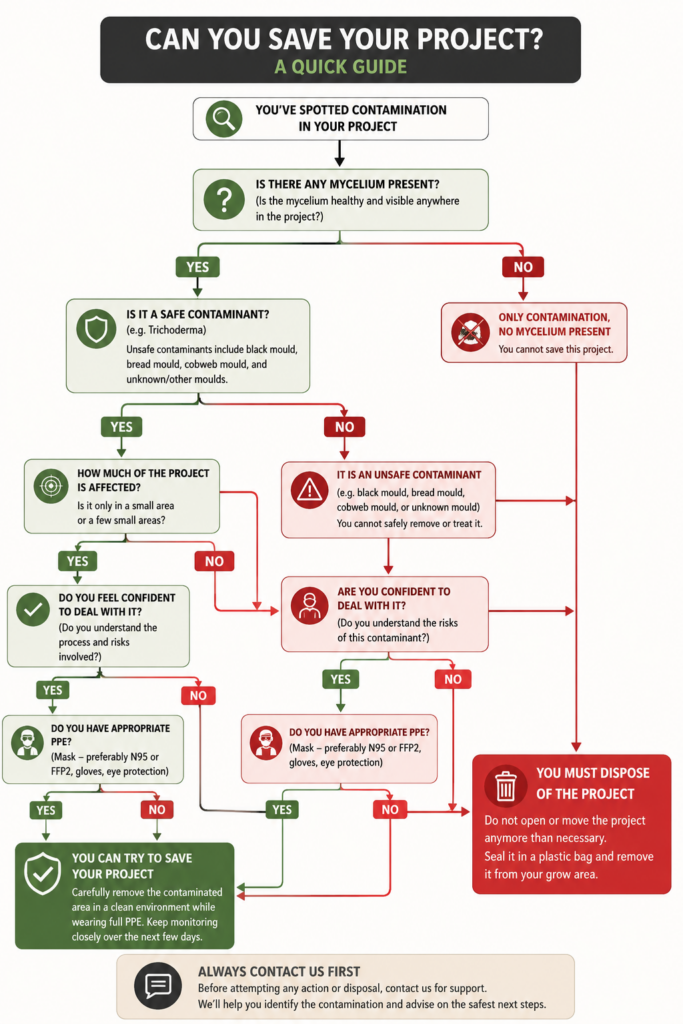
Flow chart describing the criteria for if you can safely help and support a contaminated project.
If you're not sure about whether you can save your project, it's always best to contact us before making and decisions.

Isolation, Removal, Disinfection and Inspection

This must be done quickly, as the longer contamination is left the more chance it has to release it’s spores and contaminate more of your project!

Isolation and Removal

If the contamination is in a small area of the project and is surrounded by healthy mycelium, we can easily isolate the contamination and remove it.

Ensure you have PPE (clean gloves, mask and eye protection if you have it) and alcohol spray or wipes to disinfect the knife or scalpel you intend to use. We strongly recommend using PPE as although common contaminants aren’t dangerous, they can be irritating!

Removing contamination is done at your own risk, and going against our advice for more harmful contaminants is highly discouraged.

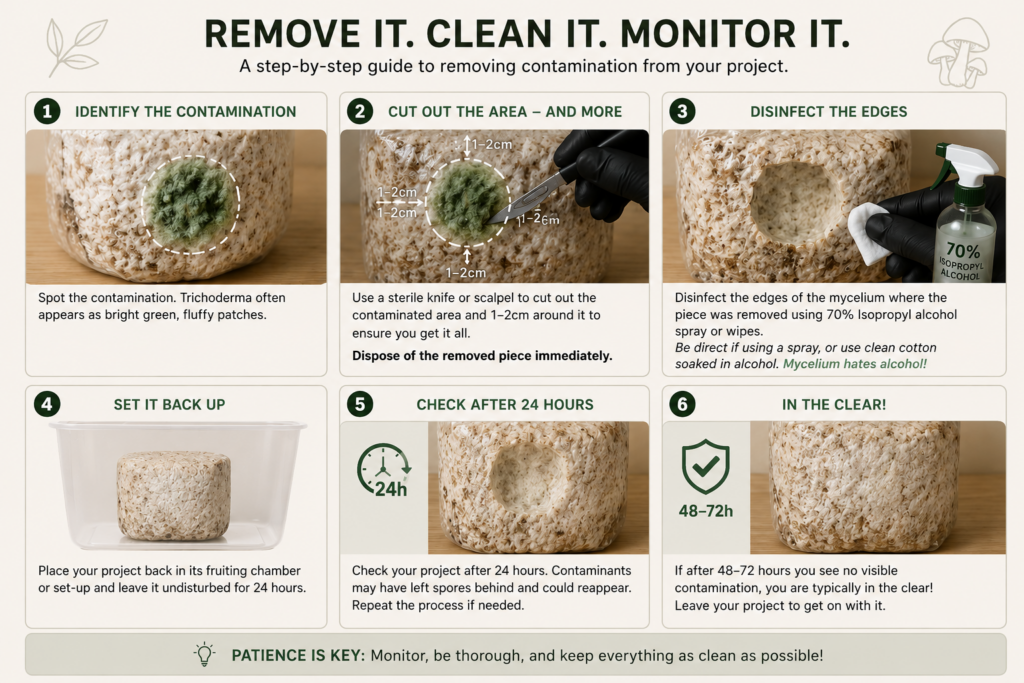
Step by step guide on how to remove contamination from a project.
Make sure PPE is worn throughout, and if in doubt about any stage please contact us!

Disinfection and Inspection

After you have removed and disinfected the area, set your project back up and leave it for 24 hours. You must check on it after this point as contaminants which have deposited spores within the bag may reappear and this process may have to be repeated.

If after 48-72 hours you see no visible contamination, you are typically in the clear! You can now leave your project to get on with it.

Disclaimer

This information is intended for educational purposes only, for use with Gourmet Mushroom Grow Kits (i.e., Lions Mane, Turkey Tail, etc.). We are not responsible, nor do we condone or encourage, the use of this information for other purposes.

Any removal of contamination is done so at your own risk. We do not encourage unsafe practices, such as removal of dangerous moulds or opting not to use PPE. We encourage you to be responsible and safe, and if unsure to please contact us for further support.

If you do find yourself experiencing contamination within one of our kits and wish to reach out for support, you must provide images and should not throw out the project until you have spoken to us in the event we need it back for further inspection. To do otherwise may hinder our efforts in supporting you with another kit.

Leave a Reply

Your email address will not be published. Required fields are marked *